The in-app intro, written out as one page. Six steps, five minutes — and they are the same six steps for every meeting app, because MirrorCaption listens to audio instead of plugging into your meeting platform.
Before you start
What you need:
- Chrome or Microsoft Edge on Windows or macOS — or the desktop app, which skips the share dialog entirely.
- Something to caption — a meeting, a webinar, a video, someone across the table. It doesn't have to be running yet.
- An account — one free hour of transcription, no card.
On a phone? See MirrorCaption on mobile instead.
Want the in-app intro back? Settings → Show intro again.
Works with any meeting app
MirrorCaption doesn't integrate with your meeting platform — it reads the audio your computer is already playing, plus your microphone. That single fact is why one setup covers every case:
- Video calls, in a browser tab or in a desktop app — Zoom, Microsoft Teams, Google Meet, Webex, Slack, Discord, Lark, and the rest. You pick the window in the share dialog; the app itself never knows.
- Anything else that makes sound — a webinar you're watching, a recorded lecture, a video, a podcast, a phone call on speaker.
- In-person conversations — turn System Audio off and let the microphone do the work.
Set up in six steps
Open mirrorcaption.com/app or the desktop app. Most controls below sit in the bar under the transcript, in this order.
Step 1 — Turn on System Audio
This is what lets MirrorCaption hear other people. The System Audio switch is at the left of the bar and it is off by default. What happens after you flip it depends on which version you use.

Web app
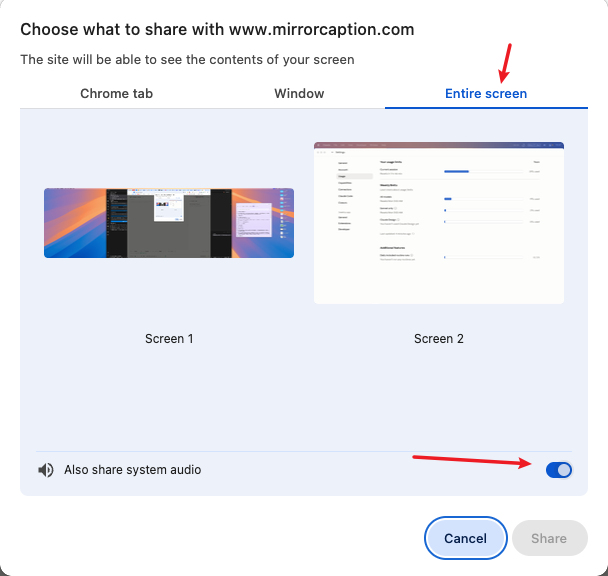
The browser opens its share dialog. Pick Entire Screen or Window — Chrome Tab only works if the meeting itself runs in a browser tab — and turn on the audio toggle inside that dialog. Miss it and only your microphone is captured, which is the most common reason captions stay empty.
Desktop app
No share dialog at all — the switch is the whole step. On macOS, just follow the system prompt the first time. If no prompt appears, tick Screen Recording for the app under System Settings → Privacy & Security, then quit and reopen the app — macOS only applies it on the next launch.
Step 2 — Set the two language pairs
Two pills, one panel each: They speak is the meeting audio, You speak is your microphone. Left is the language heard, right is the language it comes out in.
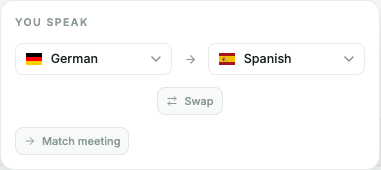
Three combinations cover almost everything. The examples use a Spanish meeting and a German reader.
Two directions — the usual case
The room speaks Spanish and you read German; you answer in German and it goes out as Spanish. Turn on Speak translations if the others should hear it, not just read it.

You speak the meeting language too — Match meeting
You speak Spanish as well, so open the You speak panel and press Match meeting — your own words are then translated the same way as everyone else's. The button toggles: it reads Reverse mic when your microphone is set the opposite way round.

Same language on both sides — transcript only
Pick the same language on both sides when you only want a record of the meeting. You get the transcript and the AI summary, and nothing is translated.

Whatever the combination, the left side has to match what is actually being said, or captions may stay empty. Save bookmarks a pair you use often.
Step 3 — Grant microphone access and pick the input
Allow microphone access, then check the Microphone dropdown and pick the device you actually talk into. The level bar moves while you speak — quickest way to confirm you got the right one.

Step 4 — Optional: speak the translation aloud
Speak translations reads your translated words out loud — useful when nobody on the call speaks your language. Available once source and target differ.
Step 5 — Sign in to unlock your free hour
Account button, top right. Signing in unlocks 1 hour of free transcription — enough to try everything end to end.
Step 6 — Press Start transcription
In the browser, if you already picked a source in step 1 you won't be asked again; if you haven't, the share dialog opens now. The desktop app never asks. Captions and translation start a second or two later.
Your first run
Do the first run in two passes. It costs a minute and rules out the environment problems that are hard to diagnose later:
System Audio off, start, talk for a few seconds. Captions mean your account, language pair and server connection all work.
Stop, System Audio on, start again on a video. If pass 1 worked and pass 2 doesn't, it's the share dialog's audio toggle or your network — not your settings.
Now join the real meeting. Keep MirrorCaption in a second window next to the call, or float it as a small always-on-top window.
While the session runs
Original and translation stream side by side, and a rolling AI summary builds in the side panel every 60–90 seconds — enough to catch up on a meeting you joined late. Your hours tick down by the minute, shared across desktop and mobile.
After you stop
The session lands in your history: export the transcript, or generate a full summary with decisions, action items and clickable timestamps.
Reference for everything after the first run: desktop and mobile in detail, AI summaries, troubleshooting.
1. Quick Start
MirrorCaption gives you live, AI-powered captions and translation in your browser — no install, no extension. You get one free hour the first time you sign in. This section gets you to your first translated sentence in under two minutes.
Create an account
Open mirrorcaption.com/app.
Click Sign in and continue with Google, or use email + magic link.
You're in. Your first hour is on us — no card needed.
Choose the right tool
MirrorCaption ships two complementary modes:
- Meet — for video calls on your laptop or desktop. Works alongside Zoom, Teams, Google Meet, and any other call you take in a browser. It also works for in-person meetings in the same room — just toggle off System Audio on the left so only your microphone is captured. Best on desktop Chrome or Edge.
- Talk — for face-to-face conversations on your phone. Two-way translation, large captions, optional read-aloud.
You don't have to pick — both share one account and one hour bank.
2. MirrorCaption Meet (desktop video calls)
Meet captures both your microphone and the system audio coming out of your call, sends them to the speech engine, and shows you the original transcript and a translation side-by-side.
2.1 Start a session
Join your video call (Zoom, Teams, Google Meet, etc.). It can be a separate browser tab, a desktop app, or a meeting in another window — Meet doesn't care.
Open mirrorcaption.com/app in a new tab.
Pick your source language (what people are saying) and your target language (what you want to read).
Click Start. Grant microphone permission when the browser asks.
2.2 Share system audio (the important step)
Meet needs to hear what the other people on the call are saying. The browser's screen-share dialog is the only way to give it that audio. Here's exactly how:
When the share dialog opens, switch to the Entire Screen tab (recommended) or the Chrome Tab tab.
Pick the tab or screen where your call lives.
Toggle on Share tab audio (or Share system audio for Entire Screen). This switch is the single most common cause of "no audio" issues.
Click Share.
2.3 Pick source and target languages
The source language is what's being spoken; pick the one that matches the loudest voice in the room. Target is what you read on screen — usually your native language.
2.4 Use alongside Zoom, Teams, or Google Meet
MirrorCaption doesn't replace your meeting tool — it sits next to it. Two common arrangements:
- Two windows side-by-side — Zoom on the left, MirrorCaption on the right. Best on a wide monitor.
- Floating captions — pop the MirrorCaption tab out into a small always-on-top window so it stays in view while you focus on the call.
2.5 Recording and playback (optional)
Enable recording in Settings before you start the session. Once the session ends, open it from your session history — every transcript line gets a small play button to replay just that sentence. Hold Alt (Option on Mac) and click any individual word to hear the few seconds of audio around it.
Recordings stay on your device. Nothing is uploaded.
3. MirrorCaption on mobile
On your phone, MirrorCaption comes in two flavors: a face-to-face Dialogue mode for two-person conversations, and a lightweight Meeting mode — a phone-sized version of Meet.
3.1 Dialogue mode (face-to-face)
The screen splits into two large caption areas — yours on top, the other person's on the bottom (or vice versa). Both sides see what the other just said, in the language they read.
Open mirrorcaption.com/app on your phone in Chrome.
Tap the Talk mode toggle.
Pick the two languages — yours and your conversation partner's. Tap Start and grant mic access.
Pro tip: install MirrorCaption to your home screen (browser menu → Add to home screen) so it opens like an app, fullscreen, with no address bar.
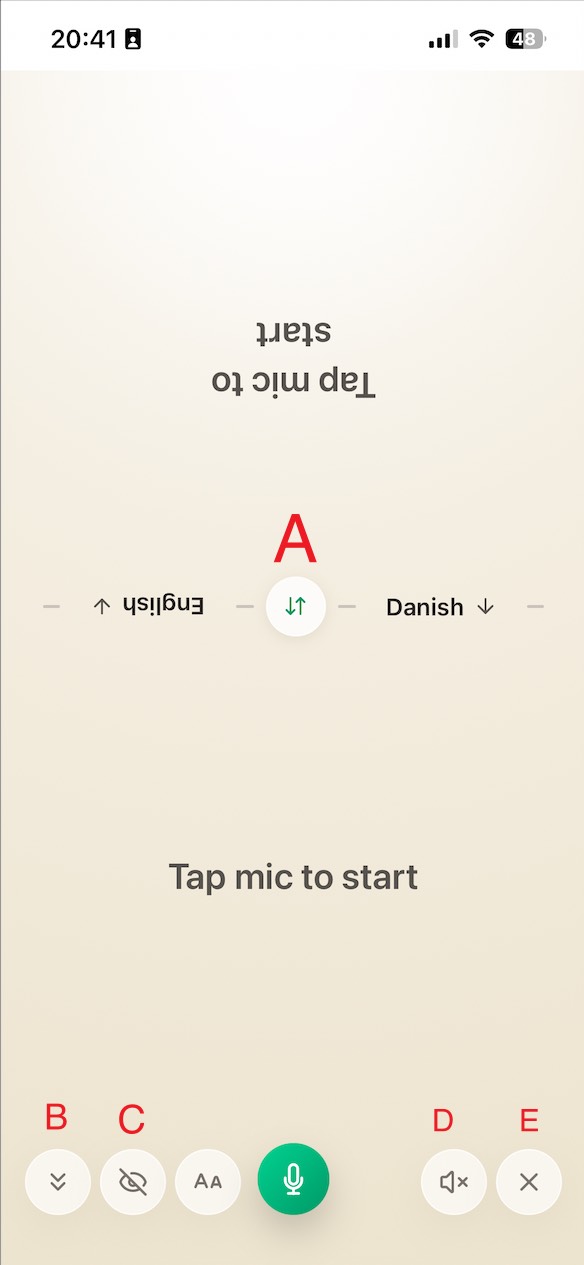
A few controls are worth knowing once a conversation is running:
- A. Direction toggle — flip between "you speak / they read" and "they speak / you read" with a single tap.
- B. Auto-scroll — toggle whether new lines jump to the top automatically. If the newest line stops appearing at the top, check this button and toggle it once.
- C. Show original — when on, both sides display the original and the translation; when off, each side only shows its configured language.
- D. Read aloud — optional text-to-speech. Voices either your own speech or your partner’s reply, depending on which side you tap.
- E. Back — return to Meeting mode.
3.2 Meeting mode (phone mini meeting room)
Meeting mode is a phone-sized version of MirrorCaption Meet. It captures what your phone's mic hears, transcribes it, translates into your reading language, and runs the same incremental AI summary as the desktop version — useful when you're sitting in a lecture or meeting and only have your phone on hand.
From the home screen, switch to Meet mode (instead of Talk), grant mic access, and tap Start. Session settings, languages, and summary live in the same gear icon as on desktop.
4. AI summary
Long meetings produce long transcripts. MirrorCaption layers two kinds of AI summary on top so you can skim instead of scroll.
Incremental summary (during the session)
As the meeting runs, MirrorCaption keeps a rolling bullet-point summary of what's been discussed in the last few minutes. It's visible in the side panel and updates roughly every 60–90 seconds. If you join late, scroll up the summary panel to catch up without reading every transcript line.
Full session summary (optional, on demand)
When you end a session, you can ask MirrorCaption to generate a longer-form summary covering the entire conversation: a 2–3 sentence overview, key decisions or action items, and the main topics with timestamps you can click to jump back to the transcript.
5. Troubleshooting
Most issues fall into one of these buckets. Try the matching fix first; if it doesn't help, write to info@mirrorcaption.com with the browser, OS, and a one-line description of what you tried.
macOS — allow your browser to record the screen
Symptom: on macOS desktop Chrome / Edge / Brave / Arc, starting a Meet session fails immediately with "Screen sharing denied" or "Could not get audio", even though you ticked the share-audio toggle in the picker.
Fix: macOS requires you to grant Screen Recording to your browser at the OS level. Open System Settings → Privacy & Security → Screen Recording, switch on the toggle next to your browser, then fully quit and reopen the browser. macOS does not pick up the new permission until the next launch.
Unsupported browser
Symptom: "Start" button is disabled, or system-audio share never works.
Fix: use desktop Chrome or Microsoft Edge for Meet. Safari and Firefox cannot share system audio in a way MirrorCaption can read. For Talk on iOS, Safari is fine.
"No audio detected"
Symptom: session starts but no captions appear, or only your voice is captioned and not the other call participants'.
Fix: the system-audio toggle in the screen-share dialog is off. Stop the session, click Start again, and double-check the Share tab audio / Share system audio switch (see § 2.2).
Also check the language pair: the first language must match what's actually being spoken in the meeting. If it doesn't match, captions may not appear at all; when it does, transcription is reliable.
Microphone permission denied
Symptom: a red mic icon appears, or starting fails immediately with a permission error.
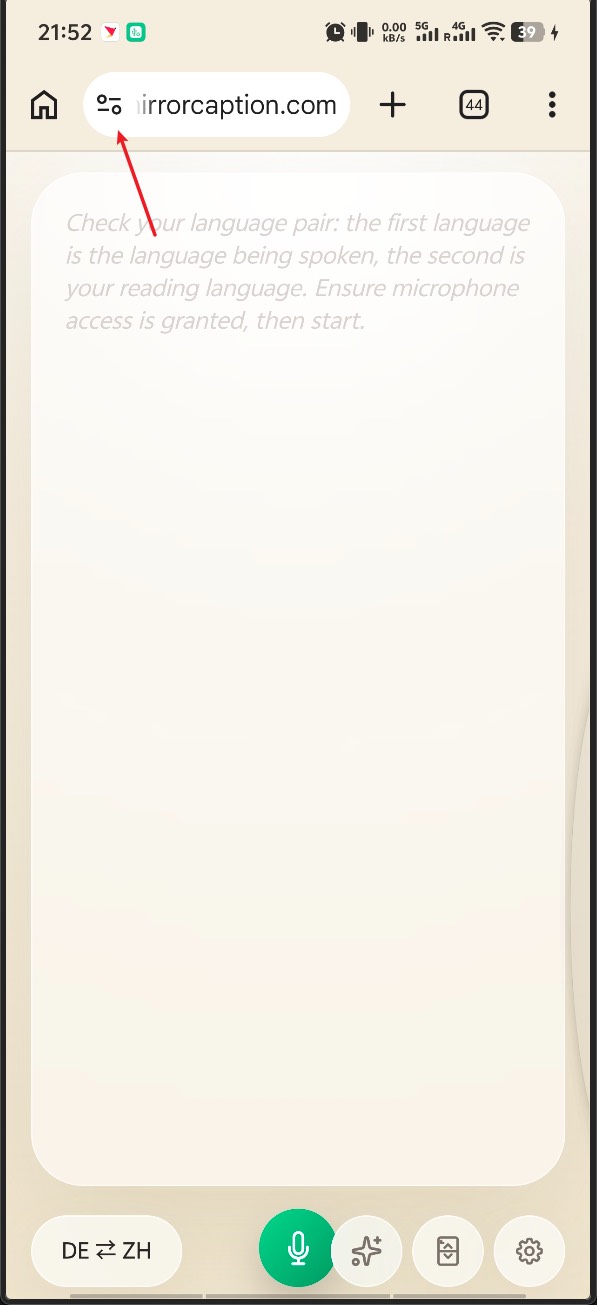
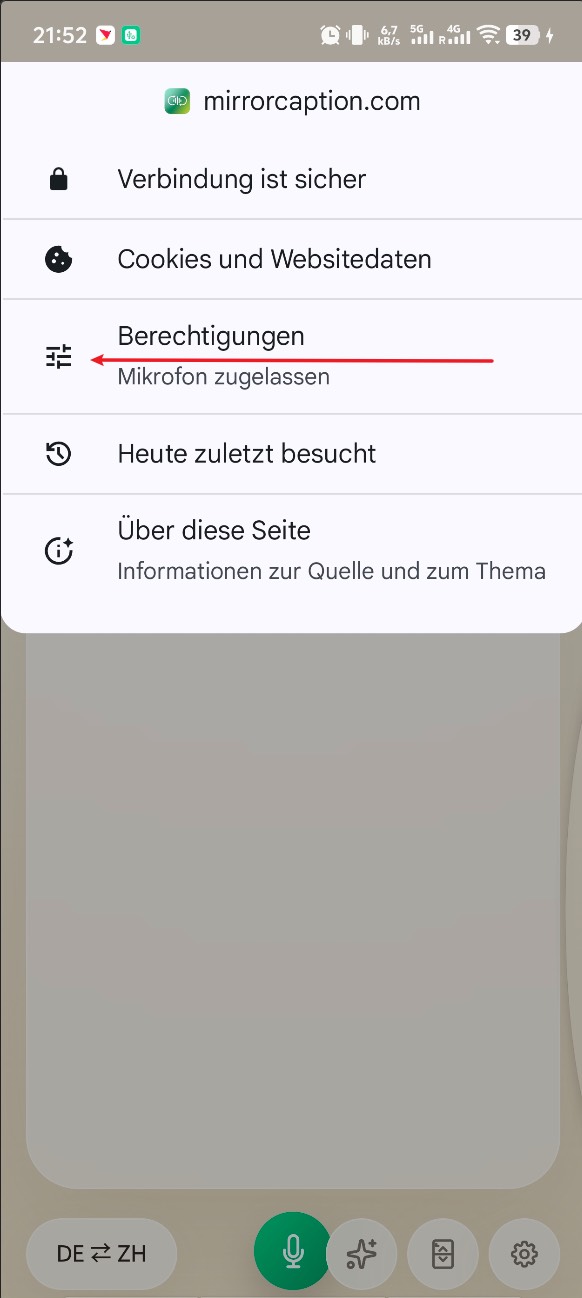
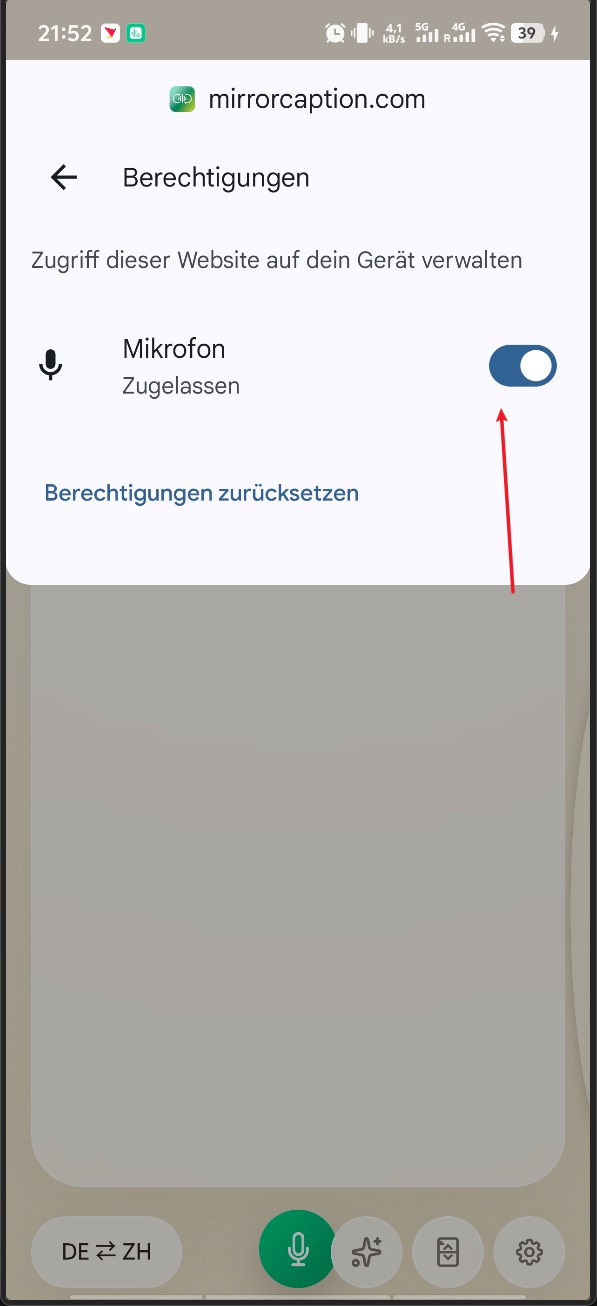
Fix: click the camera/lock icon in your browser address bar, allow microphone for mirrorcaption.com, then reload the page.
On Android: the first permission prompt sometimes fails to register. If that happens, fully quit Chrome, reopen it, then follow the three steps below to confirm microphone access is enabled for mirrorcaption.com.
Corporate network / Zscaler / isolated browser
Symptom: "Microphone access blocked" or "Could not access the microphone" even though you have allowed the permission in the browser, and the issue is consistent on a work network or a managed device.
Fix: some IT setups (e.g. Zscaler's Browser Isolation or a remote-browser sandbox) silently strip access to the microphone, camera, and screen-capture APIs. Ask your IT team to allow mirrorcaption.com (full domain) outside of the isolation policy.
Workaround while you wait for IT: open mirrorcaption.com on your phone, leave it next to your laptop speakers, and the phone's microphone will pick up the call audio from the speakers — caption quality drops a bit but is usable for most meetings.
Connection drops mid-session
Symptom: a banner says "Reconnecting…" and captions pause for a few seconds.
Fix: nothing usually — MirrorCaption auto-reconnects on flaky networks.